
 Language
- No.101 Wanbo 1st Road, Nancun Town, Panyu District, Guangzhou, Guangdong, China
- 0086-020-84886013,84886093,84886091,84886012
- sales@finegosteel.com
- Complaints & Suggestions : suggest@finegosteel.com


Industry News
How do you master welding rectangular tube for structural projects?
Structural failure often starts with a bad joint. Weak welds cost money, delay projects, and ruin reputations, but mastering the right technique ensures safety and durability every time. Welding rectangular tube requires precise preparation, specifically a 45-degree miter cut and clean bevels. Use a downhill travel angle for corner welds to prevent burn-through. Secure clamping and tack welding at all corners are essential to maintain a 90-degree angle and prevent thermal distortion during the process.
I have seen many construction projects face delays simply because the steel connections were not handled correctly. A poor weld looks bad, but more importantly, it is dangerous. In my years at Finego Steel, I have learned that following a strict process saves time and materials. Let me walk you through the exact steps I use to get a perfect result.
What is the best way to prepare the metal for a strong bond?
Dirty metal leads to weak, porous welds. If you skip the cleaning and cutting steps, even the best welding machine cannot save the project. The foundation of a good weld lies in the preparation of the joint. You must cut the tube at a precise 45-degree angle and bevel the edges to ensure deep penetration. Cleaning the metal to remove rust, oil, and mill scale is mandatory to avoid defects like porosity in the final bead.
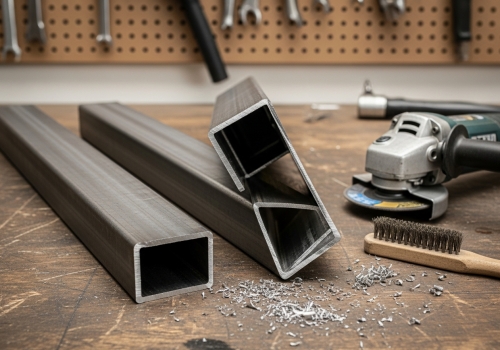
I cannot stress this enough: preparation is where the real work happens. When we process orders at Finego Steel, we ensure every cut is clean. For you to do this on-site, start with your band saw. Set it to a strict 45-degree miter cut. Once cut, you will likely see burrs—rough edges left by the saw. You must use a grinder with a hard wheel to remove these. But simply removing burrs is not enough. You need to create a bevel. This means grinding the edge of the cut metal to create a "V" shape when the two pieces come together. This V-groove allows the weld metal to flow all the way to the bottom of the joint, rather than just sitting on top. If you are welding rectangular tube with thick walls, this is non-negotiable. Without a bevel, the weld is superficial and will crack under stress. Finally, wipe everything down. Any grease or paint will contaminate the weld pool.
| Preparation Step | Tool Required | Why it is Crucial |
|---|---|---|
| Miter Cutting | Band Saw | Creates the initial 45-degree angle for a corner joint. |
| Deburring | Angle Grinder | Removes sharp metal shards that prevent a tight fit. |
| Beveling | Grinder / Flap Disc | Increases surface area for the weld to penetrate deeply. |
| Cleaning | Wire Brush / Acetone | Removes contaminants that cause weak, porous welds. |
How do you execute the weld to prevent warping?
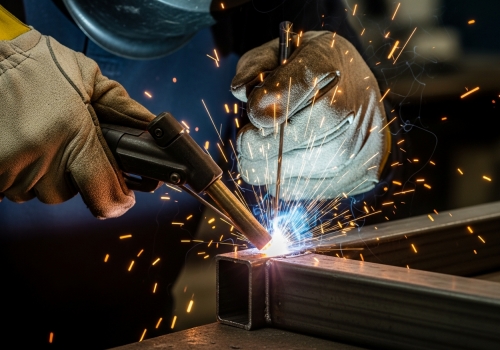
Heat causes metal to expand and pull out of shape. If you weld in the wrong order, your perfect 90-degree corner will twist into something unusable. To prevent distortion, tack weld all four corners first while checking with a framing square. Weld the inner fillet corner first, followed by the outer corner, and finish with the flat faces. This specific sequence balances the heat input and keeps the rectangular tubing straight and true to dimensions.
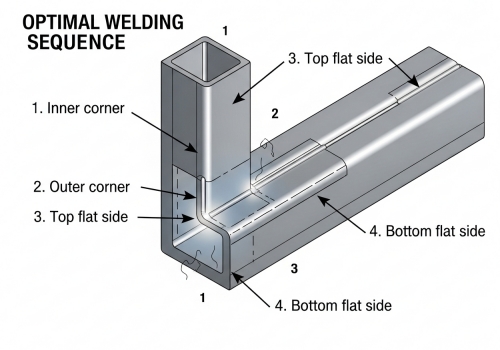
Once your prep is done, fit-up is the next challenge. Place your two pieces on a flat table. I usually leave a small gap—about 1/16 of an inch—between the pieces. This gap helps the weld sink in deep. Use a framing square to ensure the corner is exactly 90 degrees. Now, do not just start welding a full line. You must "tack" it first. Place a small spot weld on the inside corner, then check your square. Then tack the outside corner, and check again. Do the same for the flat sides. When you are ready to run the full bead, gravity is your friend. For the vertical corners, I place my MIG gun at the top and drag the weld puddle downhill. This gives me a flat, smooth finish. I move the gun in a small circular pattern. This "stitches" the two sides of the welding rectangular tube together evenly. Here is a critical tip I share with our EPC partners: Watch the heat. Rectangular tubes have long flat sides that love to warp. By welding the inside corner first, you pull the metal in. Then, welding the outside corner pulls it back. This balances the stress. If you weld one side completely before the others, the tube will bow like a banana.
What equipment ensures the best results for your project?
Using an underpowered machine leads to "cold" welds that fail inspection. You need reliable equipment that matches the material thickness and workflow of your specific job. Select a welder based on your material type and production volume. For standard steel construction, a high-quality MIG welder is efficient and strong. If you are working with aluminum, you must use an AC/DC TIG machine. Ensure your power source has a high duty cycle to handle continuous work without overheating.
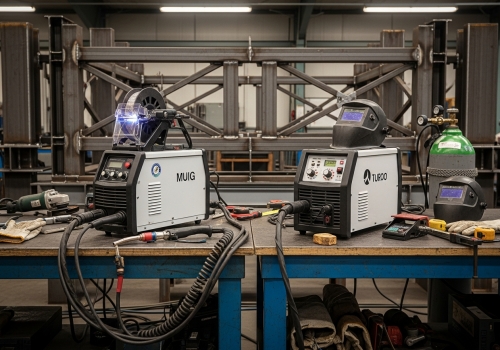
Choosing the right machine is a business decision as much as a technical one. As a Purchasing Manager, you know that downtime costs money. When welding rectangular tube for structural supports, I almost always recommend MIG (GMAW) welding. It is fast, works well on the thickness ranges we usually see in construction (3mm to 10mm), and is easier for operators to learn. However, if your project involves aluminum rectangular tubes for architectural features, you cannot use a standard DC MIG setup. You need an AC/DC TIG welder. TIG is slower but produces a much cleaner, more attractive weld that requires less grinding later. Before you buy, look at the "Duty Cycle" on the spec sheet. If a machine has a 30% duty cycle at 200 amps, it can only weld for 3 minutes out of every 10 minutes. For an industrial site, this is too slow. You want a machine that can run longer. At Finego Steel, we use industrial-grade equipment because reliability is part of our brand. Whether you buy new or used, stick to reputable brands. A cheap import machine might save $500 today but will cost you thousands when it breaks down in the middle of a rush project.
| Feature | MIG Welder (GMAW) | TIG Welder (GTAW) |
|---|---|---|
| Speed | Fast, high deposition rate | Slow, precise control |
| Skill Level | Easier to learn | Requires high skill |
| Best For | Structural steel, thick walls | Aluminum, thin walls, visible joints |
| Cleanup | Moderate (spatter) | Very low (clean bead) |
Conclusion
To get a strong joint, bevel your edges, tack weld carefully to maintain alignment, and manage your heat input. Proper preparation and the right equipment ensure structural integrity every time.
- No.101 Wanbo 1st Road, Nancun Town, Panyu District, Guangzhou, Guangdong, China
- 0086-020-84886013,84886093,84886091,84886012
- sales@finegosteel.com